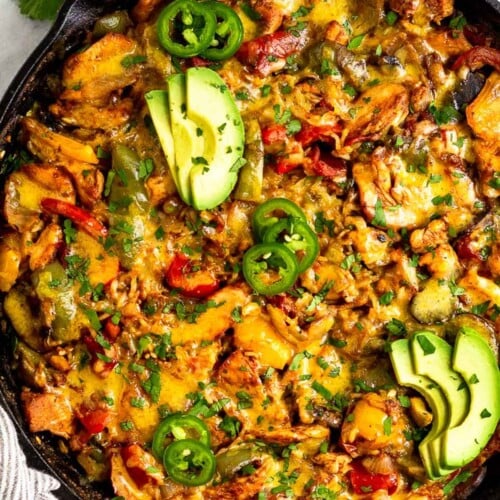

Can I get a heck yes for casserole season?! This chicken fajita casserole is one of my absolute favorites!
We are taking your favorite fajita flavors and baking them together into one healthy casserole recipe. It has seasoned chicken, onions, peppers, mushrooms, and rice all topped with melted cheese. Honestly, the warm pockets of cheese on top are icing on the cake and take it to the next level.
Never Miss a Recipe!
Get new recipes like this delivered to your inbox.

It’s hearty and comforting, full of flavor, and something the whole family will love. Plus it makes a ton and is perfect to make for meal prep or to just have leftovers for the week.
And better yet, it comes together in one pan for easy assembly and cleanup! While it takes over an hour from start to finish, most of that time is the casserole baking in the oven. It can easily be prepped ahead of time for busy weeknights.
Why we love this chicken fajita casserole recipe
- all your favorite aspects of fajitas combined into one cozy casserole recipe
- it only requires one pan!
- made from simple ingredients
- it makes a healthy and macro-balanced meal – we have protein from the chicken, carbohydrates from the rice, some healthy fats from the cheese, and fiber from the veggies.
- makes a ton and is great meal prep – we always have leftovers for the following days.

Are chicken fajitas healthy?
Chicken fajitas are a healthy addition to any diet. Chicken is a low-calorie protein with B vitamins, selenium, and phosphorus. Fajitas also have lots of bell peppers which contain vitamin C, vitamin A, and B vitamins. When making them at home, you can control the amount of oil used to help keep the fat lower.
Is rice healthy?
Rice can be a healthy addition to most people’s diet. It is high in carbohydrates, which are your body’s preferred source of energy and are important for active people. White rice is more processed than brown, meaning the germ and all of the bran layers (hull, husk, and bran) are removed so that what remains is a simple starch (the endosperm). This means it is easier to digest for some.
Brown rice is not so it is more nutrient-dense – it has fiber, manganese, selenium, magnesium, and B vitamins. Both are good options, it just depends on which one you prefer more.
We eat rice a few times a week because it’s super affordable, healthy, and an easy carbohydrate for meals. It’s also a great source of post-workout recovery carbohydrates for active individuals to replenish muscle glycogen stores (energy) and help with recovery (carbs and protein are most important post-workout).
Lundberg Farms is my go-to rice. Lundberg is independent (family-owned and operated since 1937!) and produces USA-grown rice that is always farmed with the highest care for the environment.
Chicken fajita casserole ingredients
- olive oil
- chicken breast
- onion
- bell peppers – I used red, green, and yellow/orange
- mushrooms – not in your typical fajitas, but I enjoy them in this recipe and it adds more veggies.
- brown rice
- canned fire-roasted tomatoes
- canned green chilies
- taco seasoning
- chicken broth
- shredded cheddar cheese
- salt and pepper

How to make chicken fajita casserole
- Preheat oven to 375 degrees Fahrenheit.
- Make your chicken. Heat up a large enameled cast-iron skillet or oven-safe pan (I used 12 inches – it needs to be large) over medium heat. Add oil and let it get hot. Add chicken, 1 tablespoon taco seasoning, salt, and pepper, and saute for 2-3 minutes until browned on the outside (chicken does not have to be cooked all the way through). Remove from pan and set aside.
- Make your vegetables. To the same pan, add onions, a little salt and pepper, and saute for 2-3 minutes until slightly softened. If needed, add a splash of broth (you can use some from the amount you measured out) if you need to deglaze the pan. Add peppers and remaining taco seasoning and saute for another 2-3 minutes.
- Mix your casserole. Add rice and mix well to combine and let toast for 1-2 minutes. Add in the cooked chicken, fire-roasted tomatoes, green chiles, and mushrooms, and mix well to combine. Add broth and carefully stir to make sure it is well incorporated. You want to make sure you have enough liquid so you can see a little on the top, but not submerge everything. Not enough liquid and you will be left with uncooked rice. Too much and it will be too soggy and won’t absorb. See the pictures for reference.
- Bake. Cover with tin foil and bake for 45 minutes. Remove the foil and bake for another 10-15 minutes until the liquid is absorbed. The rice should be cooked through and fluffy. Remove from oven, sprinkle with shredded cheese, and bake for another 1-2 minutes until cheese is melted.
- Enjoy! Top with optional toppings or topping of choice and enjoy!


Can you use already-cooked rice?
Yes, to save some time, using cooked rice will work the same, but you will not need the broth. Simply add all the ingredients except the rice and mix well. Cover and bake for 25-30 minutes to help absorb some of the liquid from the canned tomatoes. Add cooked rice, mix well, and bake for another 5-10 more minutes uncovered, or until liquid is absorbed. Then add the cheese and bake until melted.
Can you use cauliflower rice instead of rice to make it low-carb?
To make this lower in carbs, you can swap out the rice for cauliflower rice. To use cauliflower rice, simply add all the ingredients except the rice and mix well. Cover and bake for 25-30 minutes to help absorb some of the liquid from the canned tomatoes. Add cauliflower rice, mix well, and bake for another 5-10 more minutes uncovered, or until liquid is absorbed. Then add the cheese and bake until melted.
What if I don’t have a cast-iron or a large enough skillet?
If you don’t have a large skillet, no worries at all. Simply make the chicken and veggies mixture and then add it to a large casserole dish or baking dish. Add the remaining ingredients and follow the directions as written. It works the same, you just have to dirty another dish.

Is fajita seasoning the same as taco seasoning?
Fajita seasoning and taco seasoning are similar, but fajita seasoning is usually a little less spicy than taco seasoning. They can be used pretty interchangeably though.
If you have time, making homemade taco seasoning takes this casserole to the next level. It’s much better than store-bought and super easy to whip up – you only need a handful of spices you probably already have in your pantry.
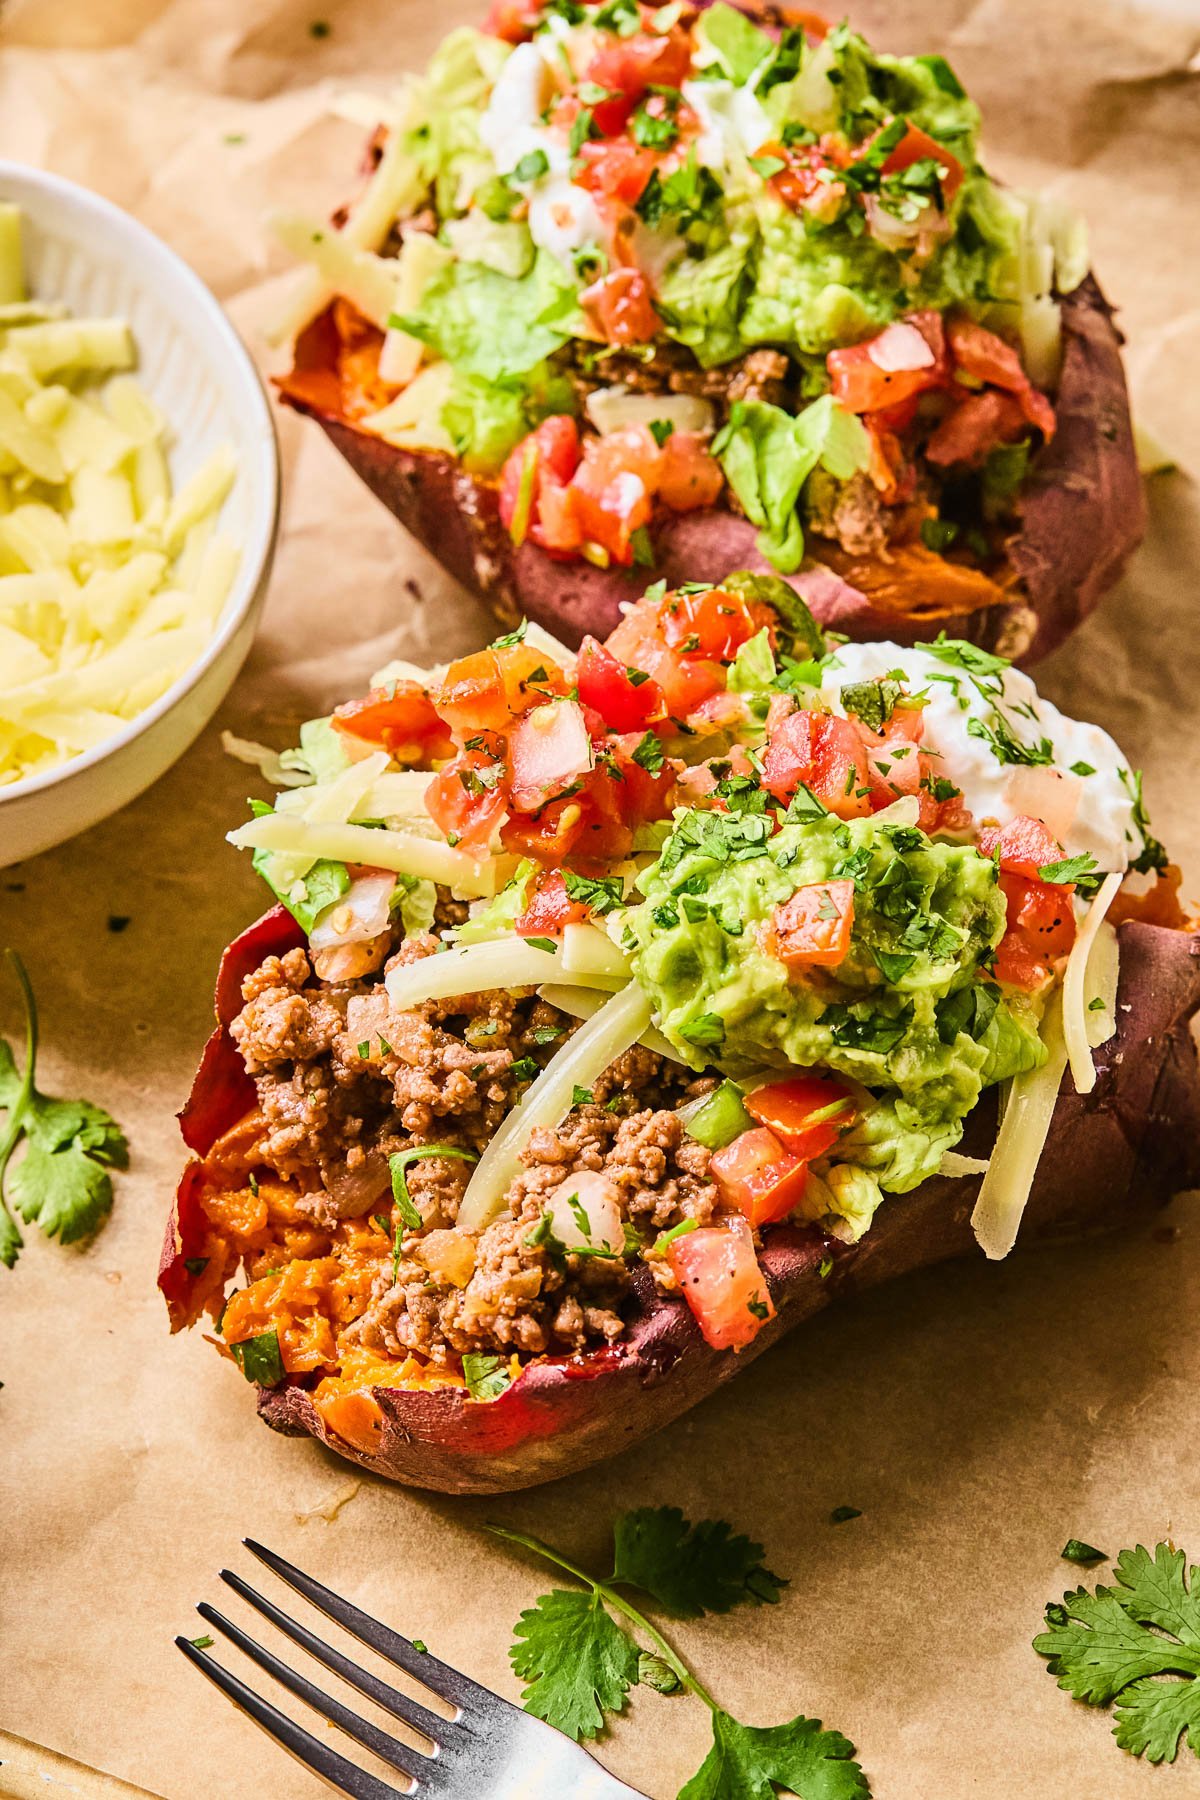
What to serve with chicken fajita casserole
This chicken casserole is a complete meal as is, but if you to serve it with a few things, here are my suggestions:
- black or refried beans
- tortilla chips
- flour or corn tortillas – stuff it inside them!
- shredded lettuce
- diced tomatoes
- avocado or guacamole
- toppings – greek yogurt, sour cream, jalapeno, fresh cilantro, salsa, hot sauce, lime juice…

Meal prep chicken fajita casserole
This chicken fajita casserole is a great dish to prep ahead of time or meal prep for the week! There are a few different ways you can meal prep it:
- partial prep – make the chicken and veggie mixture ahead of time and store it in the refrigerator in an airtight container. When you are ready to eat, simply put everything into your cast iron or a large casserole dish and bake it in the oven.
- full prep – make it according to the directions and store it in the fridge for a quick meal during the week.
Storage
- fridge – store in an airtight container in the refrigerator for up to 4-5 days.
- freezer – this recipe would be perfect to freeze. You can either freeze the whole recipe in a large container or in individual servings. It should last up to 3 months in the freezer. When ready to eat, let defrost in the fridge or on the counter. If reheating the whole pan, you can bake it to warm through.
- reheating – reheat it in the microwave or a skillet until warmed through.
Substitutions
- oil – any kind of neutral oil will work.
- chicken breast – you can use chicken thighs instead of breasts. This will add a little more fat to the recipe.
- veggies – we are using classic fajita veggies, but you can leave out the mushrooms if you don’t like them.
- brown rice – I have not tried this, but white rice should work instead. You may need to use a little less liquid and less cooking time though.
- canned fire-roasted tomatoes – regular canned diced tomatoes will work instead.
- canned green chilies – you can leave these off if needed, but I find they add a nice spice to the recipe. Use mild or hot.
- taco seasoning – fajita seasoning will work the same as taco seasoning.
- broth – chicken, veggie, or beef broth will work the same.
- cheese – Monterey jack or pepper jack cheese would work instead of cheddar. You can also use dairy-free cheese or you can leave it off to make it dairy-free.
More healthy casserole recipes
- beef taco casserole
- buffalo chicken casserole
- turkey kale ranch casserole
- chili spaghetti squash casserole
- jalapeno popper chicken casserole
- chicken taco casserole
If you love quick and easy meals and want to learn how to build a balanced plate, check out our FREE How to Build a Balanced Plate Guide!


Chicken Fajita Casserole
equipment
- 12-inch oven safe skillet
ingredients
- 1 tablespoon olive oil
- 1 1/2 pounds chicken breast, sliced into thin strips
- 2 tablespoons taco seasoning (divided)
- 3 cups julienned onion (305 grams/1 medium)
- 5 heaping cups julienned bell peppers (625 grams/3 medium)
- 1 1/2 cups brown rice
- 1 heaping cup sliced mushrooms (100 grams)
- 1 can (14.5 ounces) fire-roasted tomatoes
- 1 can (4 ounces) diced hatch green chiles
- 1 3/4 cups chicken broth
- 1 heaping cup shredded cheddar cheese (3 ounces)*
- salt and pepper, to taste
- optional toppings: avocado, cilantro, lime juice, greek yogurt/sour cream, hot sauce…
instructions
- Preheat oven to 375 degrees Fahrenheit.
- Make your chicken. Heat up a large enameled cast-iron skillet or oven-safe pan (I used 12 inches – it needs to be large) over medium heat. Add oil and let it get hot. Add chicken, 1 tablespoon taco seasoning, salt, and pepper, and saute for 2-3 minutes until browned on the outside (chicken does not have to be cooked all the way through). Remove from pan and set aside.
- Make your vegetables. To the same pan, add onions, a little salt and pepper, and saute for 2-3 minutes until slightly softened. If needed, add a splash of broth (you can use some from the amount you measured out) if you need to deglaze the pan. Add peppers and remaining taco seasoning and saute for another 2-3 minutes.
- Mix your casserole. Add rice and mix well to combine and let toast for 1-2 minutes. Add in the cooked chicken, fire-roasted tomatoes, green chiles, and mushrooms, and mix well to combine. Add broth and carefully stir to make sure it is well incorporated. You want to make sure you have enough liquid so you can see a little on the top, but not submerge everything. Not enough liquid and you will be left with uncooked rice. Too much and it will be too soggy and won't absorb. See the pictures for reference.
- Bake. Cover with tin foil and bake for 45 minutes. Remove the foil and bake for another 10-15 minutes until the liquid is absorbed. The rice should be cooked through and fluffy. Remove from oven, sprinkle with shredded cheese, and bake for another 1-2 minutes until cheese is melted.
- Enjoy! Top with optional toppings or topping of choice and enjoy!
Last Step! Please leave a review and rating letting us know how you liked this recipe! This helps our business thrive so we can continue providing free recipes and high-quality content for you.
notes
nutrition
This post was originally posted in September 2019 and sponsored in partnership with Lundberg Farms and has since been updated. All opinions expressed (as always) are my own. I only partner with brands I trust and recommend – thank you for helping make Eat the Gains possible!

Get My Guide On
How to Build a Balanced Plate
No recipe, no problem! Learn the key factors to build a balanced plate for sustainable eating and to fuel your body to support your activity, goals, and lifestyle.


My rice never cooked. I don’t understand why not.
Sorry to hear that, LT. Curious as to what kind of rice you used? It needs to be mostly covered by the liquid to cook.
We had a ton of peppers leftover from a party so looked for a recipe we could use them in. This was SO SIMPLE, EASY, and DELICIOUS! I already cant wait to eat the leftovers!
So glad you enjoyed it, Emily! Thanks for trying it!
Fabulous! Perfect combination of ingredients. Easy to make. Crowd pleaser. So so. Good!
So glad to hear it was a hit. Thanks, Dee!
We loved this recipe as a change from typical fajitas. Since brown rice takes a long time to cook I precooked the rice and cut back on the liquid (broth). I also bought a can of fire roasted tomatoes with hatch chilis which was really good (I might use this instead of Rotel (r) in other recipes). I made this for 2 so had to adjust all the quantities but I like that you can adjust the heat and use several types of bell peppers and add avocado and other toppings as desired.
Oh I love that idea! Thanks for trying it Kurt and glad you enjoyed it!